Body Brushing

Throw away your body exfoliators, there’s something I would like to introduce you to…and that’s body brushing. This is a completely natural, chemical free way of  increasing circulation, exfoliating, detoxifying and stimulating bodily processes. This technique stems from an ancient Aryudevic cleansing philosophy – we’re talking thousands of years old!

gp_bodybrush_b1

Dry skin brushing is what it sounds like…you use one of those odd looking, long handle

[Skip down to Quick and Easy for the step by step instructions.d wooden brushes with firm bristles to brush your body
Skip to Why for a list of benefits]

Here’s what you need to do:

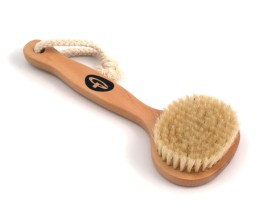
Get yourself a brush (natural bristles, not synthetic please!)  For a first timer, it can be kinda scary because the bristles seem so stiff and coarse and you may be a little hesitant. But I promise, in due time – you’ll look forward to the invigorating sensation that you feel afterwards! If there is a selection to choose from, try find the least firm/most softest of the lot.

This is something that should ideally be done daily – it only takes 5 minutes, I promise. It doesn’t matter if you’re a morning or night shower-er, you just need to give yourself an extra 5 minutes of pampering and it will make the hugest difference. I swear, after you do it for the first time,  you’ll hop in the shower and notice how soft your skin feels. If not then, definitely when you hop out and moisturise your skin. Keep it up and you’re skin will feel silky smooth – softer and smoother than you’ve ever felt before. I can guarantee it!

 Quick and Easy:

  • Get nakiedownload
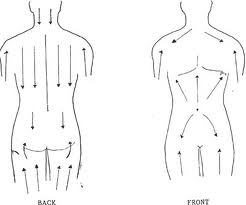
  • Starting at your feet, work the brush in circular motions or upward strokes (your preference). Start at an intensity and pressure that is comfortable for you – this shouldn’t be a painful experience
  • Move up your legs, knees and thighs. You can pay special attention to your booty and thighs if you have cellulite. The pressure and stimulation of the brushing will encourage the fat deposits to release
  • Brush your stomach in a clockwise direction (mimicking the movement of your colon)
  • Reaching behind, do the same movement on your back – as high as you can go
  • Brush your hards, forearm and upper arm – pulling the brush towards you in long sweeping strokes
  • Pull the brush across your shoulders and down across your neck
  • Reach up and over your shoulder for your upper back
  • Armpits – spend some time here. Reach your arm up to the ceiling and brush down on your armpits to encourage lymphatic drainage
  • Note: please be gentle on sensitive areas where your skin is thinner (if it hurts, you need to lighten the pressure!)
  • Tap the brush over a trash can. (Wash with gentle soap and water once a week and leave in the sun to dry)
  • Shower as normal  (don’t skip the shower – you have to wash the skin of the dead skin cells)
  • Moisturise. preferably with an oil such a almond, coconut or jojoba
  • Revel in how soft and smooth your skin feels (this is a mandatory step)
  • Repeat before every shower

 Why:

  •  Boosts circulation and removes dead skin layers: dry brushing increases blood flow (this is why you may turn a rosy colour after you finish brushing)  and will  improve the texture of your skin and cell renewal.
  • Cleanses the lymphatic system and eliminate toxins: encourages the movement of proteins and matter through the drainage system and accelerates the cleaning of toxins out of the body
  • If you have keratosis pillaris (like me), you will see a significant improvement in the areas affected. The keratin build up is literally vanishing with each day that I brush and is far better for my body than lathering chemical filled creams that only temporarily help!
  • Reduces cellulite

Now go and try it!

Sachi

DIY Scrub/Mask (2 in 1)

If you’re anything like me, you can’t go past the skin care aisle without picking up something new to try out. Recently, I’ve ventured into more natural alternatives for  and have discovered a new quick face scrub/mask that leaves my skin feeling amazingly smooth, supple and hydrated. Not only is it natural, affordable and quick to make – it requires three ingredients that are readily available the kitchen. Thats right, I said three ingredients from the kitchen and it’s great for all skin types (acne-prone, dry, sensitive, combination etc).

You’ll need a teaspoon, a small bowl for mixing and the following ingredients:

  • 1 tsp Honey (preferably raw, but honestly – whatever you have at home is fine!)
  • 1 tsp Olive oil
  • 1/2 tsp Sugar (doesn’t matter if its white or brown)

Measure ingredients into bowl and mix until well combined.

  1. Cleanse your face and pat dry. Scoop up the mixture using your fingers and warm slightly by rubbing your two hands together and apply to your face in a gentle circular motion.
  2. Leave for 15-20 minutes.
  3. Before rinsing, spend 1 minute massaging the mixture into your skin.
  4. Rinse with warm water and pat dry. (It’s unlikely that you’ll need to moisturise as the Olive Oil will remain after rinsing. If you’re not comfortable with that – use a gentle cleanser and moisturise as per your skin regime).
  5. Your skin will feel baby smooth, I kid you not.

You can also use this as a lip, hand or body scrub – just eyeball the ingredients to your liking and mix away!
And if you don’t have honey, you can mix just the olive oil and sugar for a quick scrub. Or you can use the honey by itself as a  mask.

If you want to know more about the ingredients, keep reading below:
Honey: this amazing product has a tonne of nutrients and minerals that are so beneficial for your skin!! It’s antimicrobial and antiseptic which means it kills bacteria on your face. When mixed with water, it releases peroxide properties which helps to heal acne  and acts like a humectant, which means it draws moisture to your skin. It will also help to brighten your complexion, scars and age spots.

Olive oil: this gem of an oil is fantastic for your skin as it penetrates deeply and moisturises without clogging your pores. It is very high in antioxidants which means it contains anti-aging properties. It can also be used as a treatment for your hair, body, hands and nails and will leave your skin feeling smooth and supple.

Sugar: the sugar acts as a mild exfoliant to remove dead skin cells and allows the combination of honey and olive oil to penetrate into the skin.

Hope you try it out, you won’t believe how amazing your skin will feel after you try it.
Trust Me.

Sachi

Hair Health = DIY Hot Oil Mask and Apple Cider Vinegar Hair Rinse

I’m on a mission to grow out my hair! I want it long and strong and I want it to be all mine (aka no extensions). I aim to do this hot oil mask once a week, or at least once a fortnight.

Hot Oil Mask

I use a combination of coconut, peppermint and almond oil. You can honestly use any oil you want such as olive, jojoba or avocado oil and in any any ratio you prefer.

  1. Melt the coconut oil by placing the bottle in a bowl of hot (not boiling water) and waiting till it liquifies (I use coconut oil as the base of my treatment)
  2. Add a few teaspoons almond oil and a couple of drops of peppermint oil into a bowl. (I usually just eyeball it. With practice, you’ll learn what quantities work for you depending on the length, thickness and texture/type of your hair)
  3. Divide your hair from ear to ear and clip away the top half.
  4. Start massaging the oil into your scalp and then work down the length of your hair. You want to focus your attention at the scalp of the hair to increase stimulation of blood circulation and hair follicles and at the ends of hair to help keep the dryer portions of your hair moisturised.If you use peppermint oil, you will notice that your scalp suddenly feels cool and has tingling sensation which is really refreshing.
  5. Optional: after you finish applying the oil, you can choose to spray your hair with a few sprays of lavender oil mixed with water
  6. Wrap your hair into a high bun and place a shower cap over it. This traps the heat from your head and heats the oil (hence “hot oil treatment”)
  7. Microwave a small towel or turbie tie for a few seconds and then wrap over the shower cap. Leave for as long as you can. (I leave it in overnight, I recommend covering your pillow with a towel as the shower cap/towel combination may slip off during the night)

Here are the benefits of the oils I reccommend:

Coconut Oil: the  major factors of hair breakage and hair loss is the loss of protein and when coconut is applied to the hair, it moisturises the scalp and keeps the hair shaft strong. Massaging the scalp stimulates the hair follicles and allows it to absorb nutrients required for hair growth.

Peppermint Oil: balances the pH level of your scalp which is beneficial for those for have oily hair or a dry/flaky scalp. The astringent properties normalises the oil production of your hair which means less oil secretion. The pH balancing properties neutralises dryness and reduces itching of a flaky scalp. It also helps to stimulate the hair follicles.

Almond  Oil: hair follicles are strengthened as they absorb proteins from the almond oil. It also moisturises the scalp and the length of the hair, adding a (oil-free) shine to the hair. Also helps to cure dandruff.

Lavender Oil: helps to effectively control hair loss

Apple Cider Vinegar (ACV) Rinse

In the morning,apply an Apple Cider Vinegar Rinse.

  1. Fill a small spray bottle with warm water and about 1 teaspoon of Apple Cider Vinegar and shake to mix
  2. Spray liberally through the length of your hair as well as on your scalp
  3. Spend a few moments massaging your scalp
  4. Let this sit for an hour and hop into the shower
  5. Shampoo and condition as normal

ACV helps to balance the pH level, seals the cuticle and detangles the hair follicle. It cleans without stripping your hair of its natural oil. The rinse helps to breakdown the oil, making it easier to shampoo out. Your scalp will feel totally refreshed and free from product build up, your hair is voluminous, silky and very very shiny. I recommend you try this once a week for a few months and you will certainly notice a difference.

Was this useful? Let me know in the comments!

Happy hair growth!
Sachi

Welcome!!!

Hi,

My name is Sachi. Let’s get it out in the open, I’ve started a blog once before…and it didn’t turn out as I planned. I started writing articles and lost my self and personality along the way. I’ve scrapped that and decided to start afresh, with my voice and style safely captured in each and every word that I type.

Like I said in my About Me, this blog is a little bit of everything and it could be a whole lot of nothing! I’m not all about one thing and one focus in life – I’m all about being curious and wanting to know more. I’m a fan of perusing the internet and educating myself on things I am passionate about. I also have a soft spot for self-development books…there’s just something about them! You’ll find a collection of my own thoughts, some natural DIYs, and some health, fitness and wellbeing posts.

I hope that no matter how you found your way to my blog, it served you well. Hope you found what you were looking for 🙂

Sachi